 Ubiquiti
Please select a model and download HotspotOS.
DownloadHotspotOSConfigurationTroubleshoot
Please reset the AP / WiFi router to factory settings to avoid problems with some previous configuration.
Connect your computer using a LAN cable from the Ethernet port on your Laptop / PC to the PoE In port on the Ubiquiti router
Set the static IP address in 192.168.1.x range
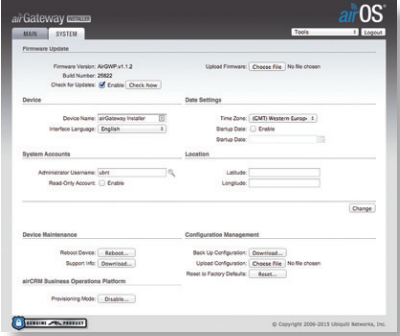
In the address bar of the web browser, enter 192.168.1.1 and login using admin as username and password as the password.
From the System tab using Choose File button navigate to the location where the HotspotOS is downloaded and press Open.
Click the Upload button and then click the Ok button to proceed with the HotspotOS installation.
Once the process is complete, the device will reboot.
The HotspotOS installation procedure can take a few minutes.
During this process, you will see information about the processing.
Reconnect LAN cable or Disable/Enable NIC card in order to get new valid IP address in 10.200.0.x range from router.
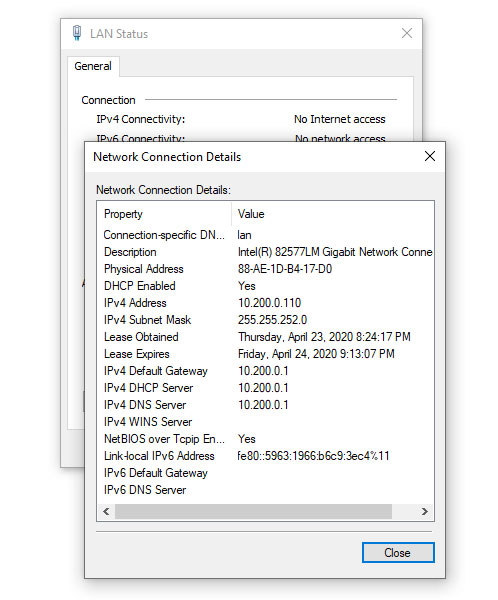
Start your browser and in URL field type http://10.200.0.1:8089/ to login to HotspotOS.
Username: admin
Password: admin

Press the Login button to access to Status tab.
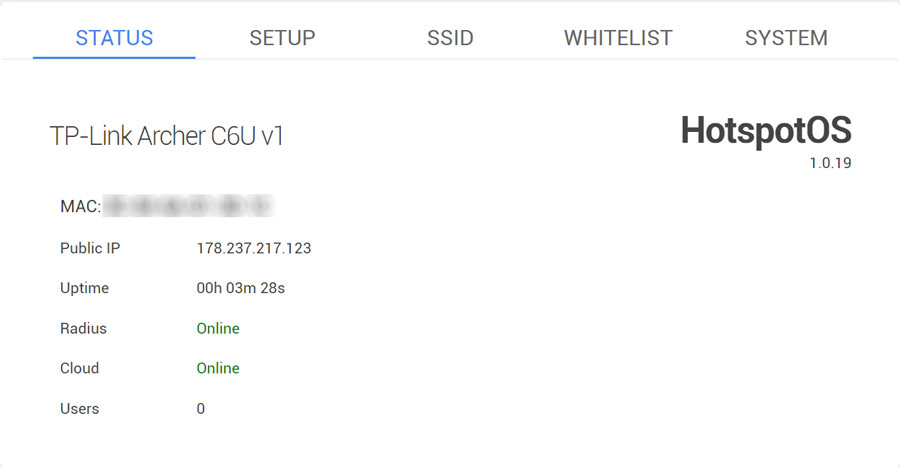
On the HotSpotOS Status page, you can check AP MAC address, Public IP, device Uptime, Radius and Cloud status, and a number of users connected to AP.
The MAC address of your AP will be used in the SignUp process.
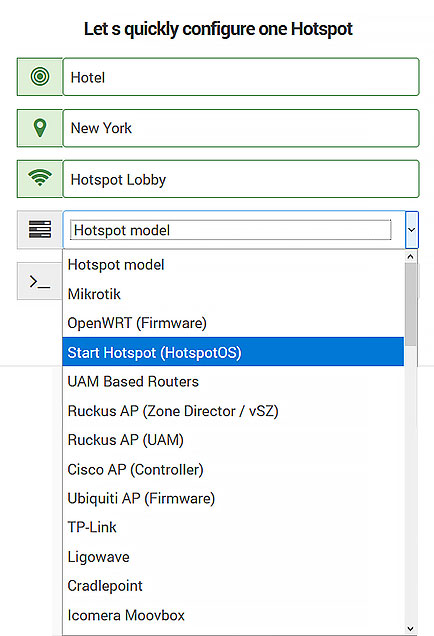
During SignUp, after typing HotSpot name, select as HotSpot model HotspotOS, and add your MAC address from the Status tab.
From the Setup page configure your AP.
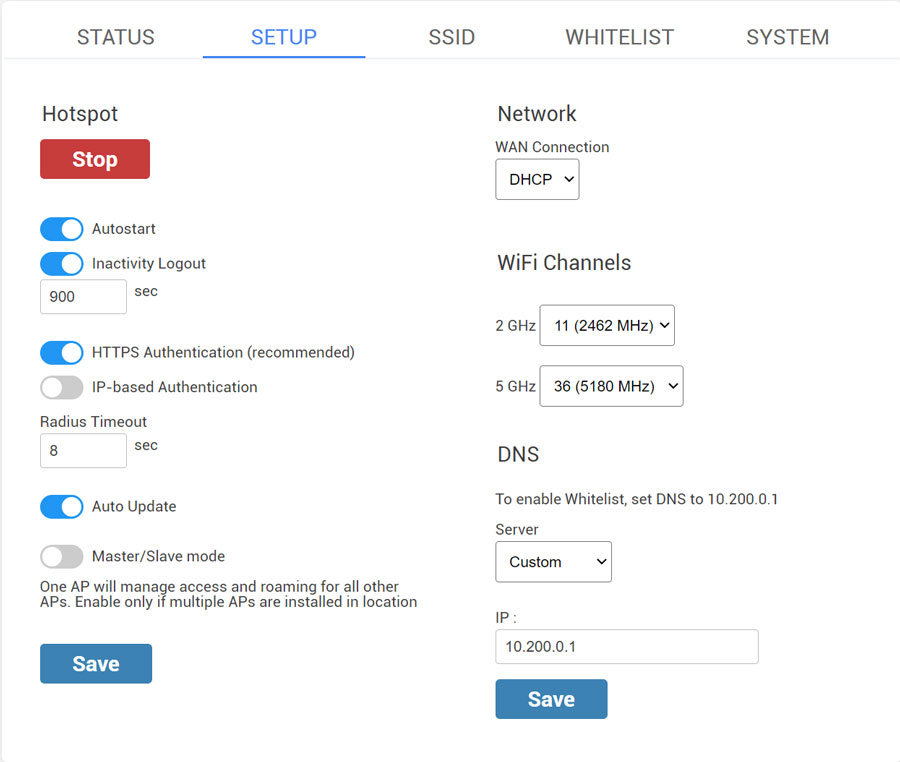
The Hotspot is started and the Autostart and Inactivity Logout options are active by default.
Inactivity Logout is set to 900 sec. Inactivity period defines how long will the device stay logged-in without activity. This prevents repeated logins if the connection temporarily breaks.
IP-based Authentication is used to switch AP domain ap.wifihotspot.io to 10.200.0.1
It is recommended to disable this option to avoid issues with https-based websites.
Radius Timeout – 8sec
Auto Update – enabled
Master/Slave mode
One AP will manage access and roaming for all other APs.
Enable only if multiple APs are installed in a location.
By default as Network WAN Connection is set DHCP, but you can choose network protocol based on your needs. Our recommendation is to use DHCP Network Protocol.
WiFi channels – Eleven channels are designated in the 2 GHz range, spaced 5 MHz apart from each other. Those eleven channels in the spectrum are allowed anywhere in the world.
DNS – Custom
IP – 10.200.0.1
Save changes.
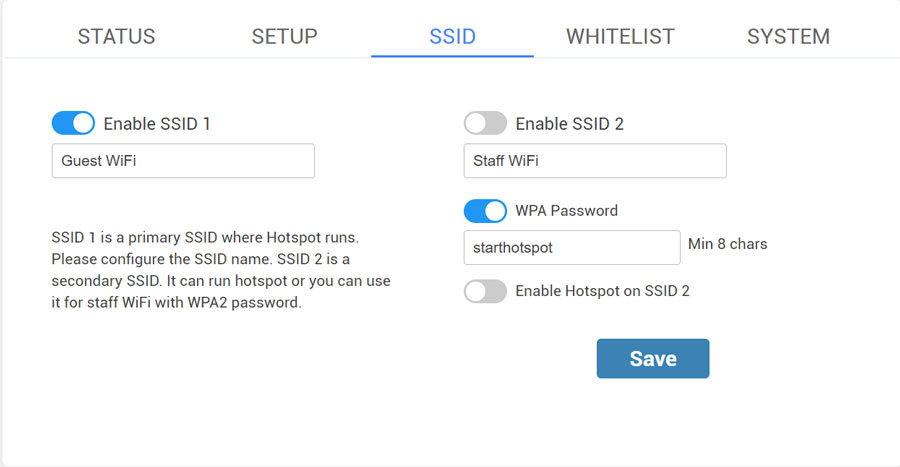
From the SSID tab, you can Enable SSID 1 and 2.
Configure the SSID name and enable it.
Secondary SSID 2 is mostly used for staff WiFi with WPA2 password but you can also enable Hotspot on it.
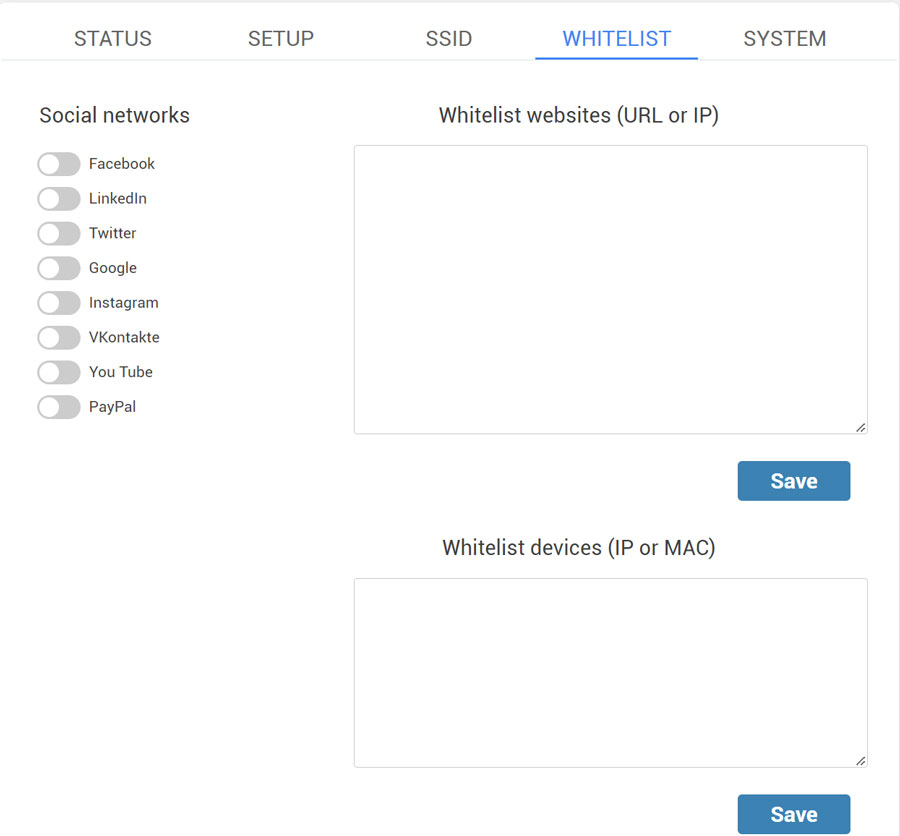
If you want to use Social network login feature or Paypal as payment gateway, enable it on the Whitelist tab and Save changes.
You can also whitelist websites based on URL, IP, or MAC.
From the System tab, you can flash HotspotOS image and change the Admin password.
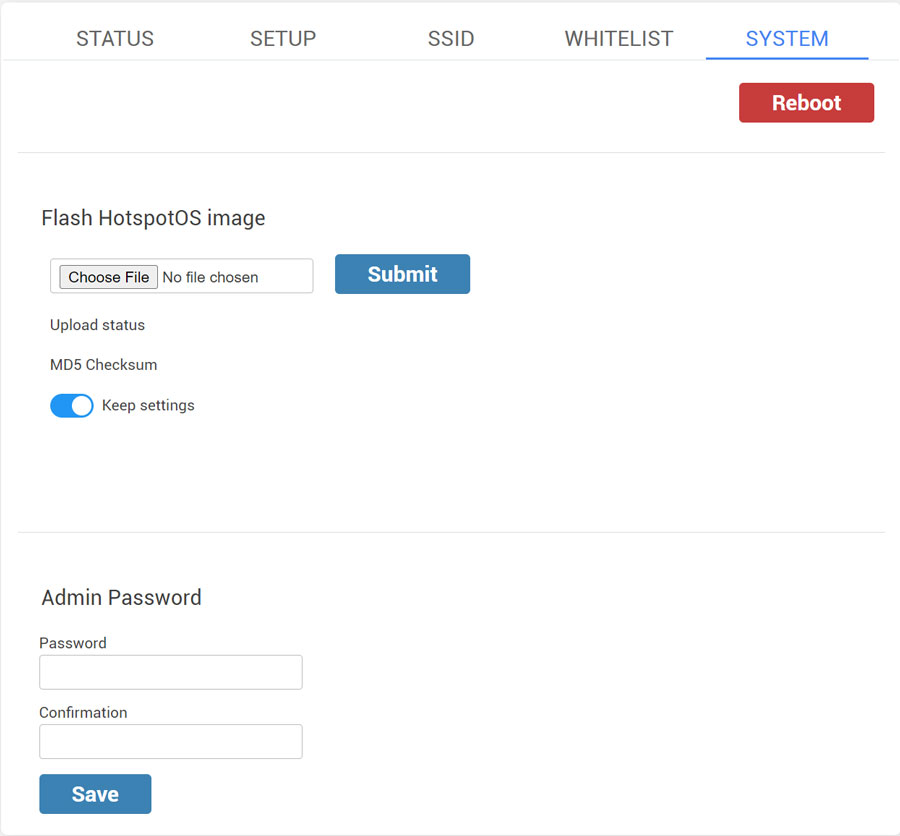
When you finish setup, restart the AP / WiFi router to apply changes.
Ubiquiti HotspotOS Download
Ubiquiti airCube ISP
Download sysupgrade HotspotOS
Upgrading via serial port / U-Boot:
– Connect the serial port via a level converter
– Power the system and stop U-Boot with pressing any key when `Hit any key to stop autoboot` is displayed. Note: Pressing space multiple times untill U-Boot reaches that location works well.
– Connect a PC with the IP 192.168.1.100 (or some other in that net)running a TFTP-Server to one of the LAN ports. Copy the sysupgrade image to the server.
– Set the U-Boot server IP with
setenv serverip 192.168.1.100
– Load the flash image to RAM with
tftpboot 0x81000000 sysupgrade.bin
– Erase the flash with
erase 0x9f050000 0x9ffaffff
– Write the new flash content with
cp 0x81000000 0x9f050000 ${filesize}
– Reset the device with
reset
Missing points:
– LED not yet supported
– Factory upgrade via web IF or TFTP recovery not yet supported
(Needs RSA signed images, for details see PR#1958)
Ubiquiti AirRouter
Download factory HotspotOS
Ubiquiti AirGateway Pro
Download HotspotOS
Ubiquiti AirGateway
Download HotspotOS
Ubiquiti Bullet M
Download factory HotspotOS
Do not flash a device that has AirOS firmware beyond v.5.5.10 or you will brick your device! You must first revert to version 5.5.10 and then flash HotspotOS https://community.ubnt.com/t5/airOS-SDK-Custom-Development/5-6-2-TFTP-ERROR/m-p/1307614/highlight/true#M2349.
If you’ve already bricked your device, you may try to recover it https://community.ubnt.com/t5/airOS-SDK-Custom-Development/AirMAX-Device-Firmware-Recovery-Procedure/m-p/1499583/highlight/true#M2499.
To flash an already running bullet with original firmware (AirOS) on CLI, you must do this:
ssh root@yourbullet
url=”https://downloads.openwrt.org/snapshots/trunk/ar71xx”
url=”$url/openwrt-ar71xx-generic-ubnt-bullet-m-squashfs-factory.bin”
wget -O /tmp/fwupdate.bin “$url”
/usr/sbin/fwupdate -m
Firmware Install Ubnt Recovery Method
If you prefer TFTP, than you can update via holding down the reset-button for 10 seconds on startup, and send the firmware to 192.168.1.20
Ubiquiti Bullet M xw
Download factory HotspotOS
Download sysupgrade HotspotOS
A) Serial console, U-Boot and TFTP
1. Connect to serial header J1 on the PCB
2. Power on device and enter U-Boot console
3. Set up TFTP server serving an HotspotOS initramfs build
4. Load initramfs build using the command tftpboot in the U-Boot cli
5. Boot the loaded image using the command bootm
6. Copy squashfs hotspotos sysupgrade build to the booted device
7. Use mtd to write sysupgrade to partition “firmware”
8. Reboot and enjoy
B) Experimental factory image flashing over SSH from airOS v6.1.7
1. You need to flash your UBNT M2HP with airOS v6.1.7 firmware
no other airOS version is currently supported
2. git clone https://github.com/true-systems/ubnt-bullet-m2hp-openwrt-flashing
3. cd ubnt-bullet-m2hp-hotspotos-flashing
4. make flash-factory FW_OWRT=/path/to/your/hotspotos-ath79-generic-ubnt_bullet-m-xw-squashfs-factory.bin
Ubiquiti NanoStation Loco M2 xm
Download factory HotspotOS
IMPORTANT READ CAREFULLY
before make a flashing of any time check you have a lower or equal version of AirOS 5.5 because 5.6 or high have changes on the u-boot and cause that you can’t recover the stock firmware easily and any change that make on it don’t survive after reboot.
A working AirOS 5.5 image is available here:
https://dl.ubnt.com/firmwares/XN-fw/v5.5.11/XM.v5.5.11.28002.150723.1344.bin
md5sum = 4f23cd9f04c4ee7dcb429b694bc3d40c
REMARK: If your device uses an AirOS 6.x.x signed version, you must first return to an unsigned version.
METHOD #1: Downgrade to unsigned version via AirOS web GUI only possible using v6.0.6-beta firmware. First upgrade/downgrade to v6.0.6-beta, then downgrade to unsigned v5.6.15. Just then it will be possible to downgrade to even lower AirOS version, e.g. v5.5.11.
v6.0.6-beta
https://www.ubnt.com/downloads/XN-fw-internal/v6.0.6/XM.v6.0.6-beta.30875.170526.0038.bin
https://www.ubnt.com/downloads/XN-fw-internal/v6.0.6/TI.v6.0.6-beta.30875.170526.0008.bin
https://www.ubnt.com/downloads/XN-fw-internal/v6.0.6/XW.v6.0.6-beta.30875.170526.0023.bin
v5.6.15 (unsigned)
https://dl.ui.com/firmwares/XN-fw/v5.6.15/XM.v5.6.15.30572.170328.1107.bin
https://dl.ui.com/firmwares/XW-fw/v5.6.15/XW.v5.6.15.30572.170328.1052.bin
https://dl.ui.com/firmwares/XN-fw/v5.6.15/TI.v5.6.15.30572.170328.1038.bin
METHOD #2: It is possible to use SSH and revert using ubnt’s fwupdate command.
Flashing via AirOS web gui
Downgrade airOS to 5.5 or lower via tftp or web and after proceed with the next steps
Once downgraded to 5.5, just go to update firmware and load hotspotos-ar71xx-generic-ubnt-nano-m-squashfs-factory.bin image
Flashing via TFTP method
First you need to put Nanostation into TFTP server mode. Turn on Nanostation and keep reset button pressed for 20 seconds, until led light start flashing differently. When you see that odd and even wifi signal leds start turning on and off, you have put Nanostation in TFTP server mode.
Now you can send image from your PC to Nanostation. You need TFTP client that will send file to Nanostation which is running TFTP server. Server is running on 192.168.1.20 address by default.
Ubiquiti NanoStation AC loco
Download factory HotspotOS
Download sysupgrade HotspotOS
1. Connect to serial header on device (8N1 115200)
2. Power on device and enter uboot console
3. Set up tftp server serving an hotspotos initramfs build
4. Load initramfs build using the command tftpboot in the uboot cli
5. Boot the loaded image using the command bootm
6. Copy squashfs hotspotos sysupgrade build to the booted device
7. Use mtd to write sysupgrade to partition “firmware”
8. Reboot and enjoy
Ubiquiti NanoBeam
Download factory HotspotOS
Download sysupgrade HotspotOS
Serial flashing:
1. Connect to serial header on device (8N1 115200)
2. Power on device and enter uboot console
3. Set up tftp server serving an hotspotos initramfs build
4. Load initramfs build using the command tftpboot in the uboot cli
5. Boot the loaded image using the command bootm
6. Copy squashfs hotspotos sysupgrade build to the booted device
7. Use mtd to write sysupgrade to partition “firmware”
8. Reboot and enjoy
Flashing through factory firmware:
1. Ensure firmware version v8.5.0.36727 is installed. Up/downgrade to this exact version.
2. Patch fwupdate.real binary using `hexdump -Cv /bin/ubntbox | sed ‘s/14 40 fe fe/00 00 00 00/g’ | hexdump -R > /tmp/fwupdate.real`
3. Make the patched fwupdate.real binary executable using `chmod +x /tmp/fwupdate.real`
4. Copy the squashfs factory image to /tmp on the device
5. Flash HotspotOS using `/tmp/fwupdate.real -m `
6. Wait for the device to reboot
Ubiquiti NanoStation Loco M5 xw
Download HotspotOS
Installation via vendor firmware:
– upload factory image via webinterface
Ubiquiti NanoStation M2
Download factory HotspotOS
Download sysupgrade HotspotOS
IMPORTANT READ CAREFULLY
before make a flashing of any time check you have a lower or equal version of AirOS 5.5 because 5.6 or high have changes on the u-boot and cause that you can’t recover the stock firmware easily and any change that make on it don’t survive after reboot.
A working AirOS 5.5 image is available here:
mirror1: https://uz.sns.it/~ilario/XM.v5.5.11.28002.150723.1344.bin
mirror2: https://dl.ubnt.com/firmwares/XN-fw/v5.5.11/XM.v5.5.11.28002.150723.1344.bin
md5sum = 4f23cd9f04c4ee7dcb429b694bc3d40c
REMARK: If your device uses an AirOS 6.x.x signed version, you must first return to an unsigned version.
METHOD #1: Downgrade to unsigned version via AirOS web GUI only possible using v6.0.6-beta firmware. First upgrade/downgrade to v6.0.6-beta, then downgrade to unsigned v5.6.15. Just then it will be possible to downgrade to even lower AirOS version, e.g. v5.5.11.
v6.0.6-beta
https://www.ubnt.com/downloads/XN-fw-internal/v6.0.6/XM.v6.0.6-beta.30875.170526.0038.bin
https://www.ubnt.com/downloads/XN-fw-internal/v6.0.6/TI.v6.0.6-beta.30875.170526.0008.bin
https://www.ubnt.com/downloads/XN-fw-internal/v6.0.6/XW.v6.0.6-beta.30875.170526.0023.bin
v5.6.15 (unsigned)
https://dl.ui.com/firmwares/XN-fw/v5.6.15/XM.v5.6.15.30572.170328.1107.bin
https://dl.ui.com/firmwares/XW-fw/v5.6.15/XW.v5.6.15.30572.170328.1052.bin
https://dl.ui.com/firmwares/XN-fw/v5.6.15/TI.v5.6.15.30572.170328.1038.bin
METHOD #2: It is possible to use SSH and revert using ubnt’s fwupdate command. More info at: https://technicalexperiments.wordpress.com/2017/08/10/downgrading-ubnt-nanostation-m2-loco-xm-ubnt-downgrade-code2-msgfirmware-check-failed
Flashing via AirOS web gui
Downgrade airOS to 5.5 or lower via tftp or web and after proceed with the next steps
Once downgraded to 5.5, just go to update firmware and load hotspotos-ar71xx-generic-ubnt-nano-m-squashfs-factory.bin image
Flashing via TFTP method
First you need to put Nanostation into TFTP server mode. Turn on Nanostation and keep reset button pressed for 20 seconds, until led light start flashing differently. When you see that odd and even wifi signal leds start turning on and off, you have put Nanostation in TFTP server mode.
Now you can send image from your PC to Nanostation. You need TFTP client that will send file to Nanostation which is running TFTP server. Server is running on 192.168.1.20 address by default.
Ubiquiti Nanostation M5 / Loco M5
Download factory HotspotOS
Download sysupgrade HotspotOS
You can install the *-factory image over the webinterface or via tftp rescue. Webinterface default address is https://192.168.1.20/
You may need to downgrade the original AirOS firmware to v5.5 in order to allow a firmware upload via the web interface. Upload via TFTP should work even for new AirOS versions.
To enter tftp rescue mode power cycle the device while keep the reset button pushed (for ~10 sec). Leds will start to blink red and yellow.
# pick an address in the range 192.168.1.1-254 for your network device
# tftp 192.168.1.20
tftp> bin
tftp> trace
# depending on your version **xm** or **xw**
tftp> put hotspotos-ar71xx-generic-ubnt-nano-m-squashfs-factory.bin
tftp> put hotspotos-ar71xx-generic-ubnt-nano-m-xw-squashfs-factory.bin
Ubiquiti LiteAP ac (LAP-120)
Download factory HotspotOS
Download sysupgrade HotspotOS
1. Connect to serial header on device (8N1 115200)
2. Power on device and enter uboot console
3. Set up tftp server serving an hotspotos initramfs build
4. Load initramfs build using the command tftpboot in the uboot cli
5. Boot the loaded image using the command bootm
6. Copy squashfs hotspotos sysupgrade build to the booted device
7. Use mtd to write sysupgrade to partition “firmware”
8. Reboot and enjoy
Ubiquiti UniFi AP
Download factory HotspotOS
Download sysupgrade HotspotOS
Device get IP address from DHCP (without DHCP the UniFi AP’s default to 192.168.1.20)
Login inside the AP with ssh ubnt@ip_address (password ubnt)
Find the image like “hotspotos-ar71xx-ubnt-unifi-*-factory.bin” on hotspotos binary repository and download inside /tmp.
Rename the image to fwupdate.bin
Use the Ubiquiti fwupdate.real script to reflash it:
fwupdate.real -m hotspotos-ar71xx-generic-ubnt-unifi-squashfs-factory.bin -d
Later 3.xx firmware versions fail to upgrade using the above and brick so use instead. If brick reset device with 20-sec-press way with connected lan-cable – after it tftp start work.
Device get IP address from DHCP (without DHCP the UniFi AP’s default to 192.168.1.20)
Login inside the AP with ssh ubnt@ip_address (password ubnt)
Find the image like “hotspotos-ar71xx-ubnt-unifi-*-factory.bin” on openwrt binary repository and download inside /tmp.
Use syswrapper to flash it:
mv /tmp/hotspotos-ar71xx-generic-ubnt-unifi-squashfs-factory.bin /tmp/fwupdate.bin
cd /tmp
nohup syswrapper.sh upgrade2
– As refered, it could be impossible to install OpenWrt/LEDE on UAP-v2 devices.
Later 4.xx firmware versions fail to upgrade via TFTP too because of different MTD partition scheme:
device nor0 , # parts = 5
#: name size offset mask_flags
0: u-boot 0x00040000 0x00000000 0
1: u-boot-env 0x00010000 0x00040000 0
2: kernel 0x00760000 0x00050000 0
3: cfg 0x00040000 0x007b0000 0
4: EEPROM 0x00010000 0x007f0000 0
rootfs partition is removed so firmware upgrade fail. By serial port break the U-BOOT boot for the prompt:
U-Boot unifi-v1.6.17.296-g1af7670c (Apr 22 2019 – 11:05:55)
DRAM: 64 MB
Base:0x80000000, Top:0x84000000, Res logbuf:0xa3ff3800, log_magic:0xf0e0f0f0 kseg: 0xa0000000
Flash: 8 MB
PCIe WLAN Module found (tries: 1).
Net: eth0, eth1
Board: Copyright Ubiquiti Networks Inc. 2014
Hit any key to stop autoboot: 1
ar7240>
and, with a tftp server at 192.168.1.254 with hotspotos firmware file, issue this commands:
ar7240> tftpboot 0x80000000 hotspotos-19.07.2-ar71xx-generic-ubnt-unifi-squashfs-sysupgrade.bin
reply:
Using eth0 device
TFTP from server 192.168.1.254; our IP address is 192.168.1.20
Filename ‘hotspotos-19.07.2-ar71xx-generic-ubnt-unifi-squashfs-sysupgrade.bin’.
Load address: 0x80000000
Loading:
done
Bytes transferred = 4194308 (400004 hex)
after:
ar7240> erase 0x9f050000 +0x00760000
reply:
………………………………. done
Erased 118 sectors
after:
ar7240> cp.b 0x80000000 0x9f050000 0x400004
the 0x400004 is the size from the last line of TFTP transfer reply:
Copy to Flash… write addr: 9f050000
done
finally:
ar7240> reset
Ubiquiti UniFi AP PRO
Download HotspotOS
Device get IP address from DHCP. If no DHCP, device will default to 192.168.1.20
Login inside the AP with ssh ubnt@ip_address (password ubnt)
Download factory.bin to /tmp
Rename the firmware image to fwupdate.bin
Use the Ubiquiti fwupgrade utils to reflash it:
fwupdate.real -m fwupdate.bin
Proceed to First Login
Ubiquiti UniFi Outdoor Plus
Download HotspotOS
An unconfigured device gets its IP address via DHCP, Login username and password is ‘ubnt’. Once the device has been adopted by a controller, it will use the device password of the ‘Site config’ page. Use ssh to login.
Login
possibly backup the stock firmware using
dd if=/dev/mtd2ro of=/tmp/jffs.img
scp /tmp/jffs.img to your backup location, rm /tmp/jffs.img from the device to save memory
Download the factory.bin image
scp the image to the /tmp directory of your device
Install HotspotOS using
fwupdate.real -m hotspotos-ar71xx-generic-ubnt-unifi-outdoor-plus-squashfs-factory.bin -d
Ubiquiti UniFi AP AC
Download sysupgrade HotspotOS
Non-invasive method using mtd
Connect only the Unifi to your PC. Configure the PC with a static IP such as 192.168.1.25/24. The Unifi will have IP address 192.168.1.20.
The mtd helper program, which writes directly to flash, has been removed from later versions of the stock firmware. These instructions assume that version 3.7.58 is running, which does include mtd. The stock firmware can be upgraded / downgraded using the CLI and fwupdate.real -m Copy using scp the 3.7.58 firmware to /tmp (see below), log in with ssh, and run fwupdate.real -m filename to flash it.
Stock firmware usually also includes a new bootloader. fwupdate.real -m will replace the bootloader with the version in the firmware file, but TFTP recovery (see below) does not. Check the md5 of the installed bootloader to confirm it has also been downgraded to the 3.7.58 version. Other versions may not work properly with HotspotOS.-
BZ.v3.7.58:# cat /dev/mtd0 | md5sum
88f66a79f671383eda6512d29aa1b804 –
If the bootloader partition md5 is not as above, re-flash 3.7.58 using fwupdate.real. That should only be necessary if you used TFTP recovery.
Next scp the HotspotOS sysupgrade to the RAM disk in preparation for flashing. “Factory” headers are not necessary for this process, thus no “factory” HotspotOS binaries exist.
Though originally an ar71xx target, these models have been ported to ath79 and ath79 is recommended for these models. Notice that there are different builds for the different models (Lite, Mesh, Pro, etc).
scp hotspotos-ath79-generic-ubnt_unifiac-XXX-squashfs-sysupgrade.bin ubnt@192.168.1.20:/tmp/
Original firmware uses a flip-flop flash layout where two complete copies of firmware exist in the flash, one being an older version as a backup in case the new one fails to boot. The bootloader checks the bs partition to determine whether to boot kernel0 or kernel1. If one partition holds a signed image and the other does not it will always prefer the signed one. If the selected partition is corrupted (unable to decompress kernel) or blank it will boot the other one.
HotspotOS does not use the “flip flop” process, it always must be installed in the kernel0 partition, and the kernel1 partition becomes reserved space. Thus we will erase the kernel1 partition to ensure that nothing can boot from there. As of 2018/02 sysupgrade does not yet support the flip-flop layout for these devices.
Connect to the device at ubnt@192.168.1.20 and run the following commands to install HotspotOS to kernel0 and erase kernel1:
# (replace xxxxx with your actual version and model specific filename)
BZ.v3.7.58# mtd write /tmp/openwrt-xxxxx-squashfs-sysupgrade.bin kernel0
Unlocking kernel0 …
Erasing kernel0 …
Writing from /tmp/openwrt-ath79-generic-ubnt_unifiac-lite-squashfs-sysupgrade.bin to kernel0 … [e/w]
BZ.v3.7.58# mtd erase kernel1
Unlocking kernel1 …
Erasing kernel1 …
Though not strictly necessary, it is a very good idea to write a zero to the first byte of the bs partition (check /proc/mtd for the correct path). The zero byte will direct the bootloader to try kernel0 first. A byte of 0x80 will attempt to boot kernel1, but since that partition is erased, the bootloader will revert to kernel0 anyway.
BZ.v3.9.19# cat /proc/mtd
dev: size erasesize name
mtd0: 00060000 00010000 “u-boot”
mtd1: 00010000 00010000 “u-boot-env”
mtd2: 00790000 00010000 “kernel0”
mtd3: 00790000 00010000 “kernel1”
mtd4: 00020000 00010000 “bs”
mtd5: 00040000 00010000 “cfg”
mtd6: 00010000 00010000 “EEPROM”
BZ.v3.9.19# dd if=/dev/zero bs=1 count=1 of=/dev/mtd4
1+0 records in
1+0 records out
1 byte copied, 7.3437e-05 s, 13.6 kB/s
The device is now ready to boot into HotspotOS. Issue the reboot command and wait about 2 minutes until the LED lights steady white. As is conventional, it will have a LAN network at 192.168.1.1 with a DHCP server and no WLANs activated. Manually setting your IP-address to the same subnet and connecting directly via LAN-cable will get you to LuCI or SSH.
OEM Firmware
You can download the official firmware archives for example at https://www.ubnt.com/download/unifi/unifi-ap-ac-lite, since the same firmware is used for UAP-AC-Lite/AC-LR/AC-Pro/AC-EDU devices.
Going back to the original firmware is no problem at all.
Flashing via TFTP (TFTP recovery)
HotspotOS cannot be flashed this way since the firmware must be signed. Any version of the official firmware should work though.
– Keep the reset button pressed while powering on the AP
– Wait until the LED ring is blinking white/blue/off (ca. 15 sec.) then release the button. The UAP is now a TFTP server at 192.168.1.20. It will not respond to pings or serve DHCP, so you must static IP your PC.
– TFTP PUT the image to 192.168.1.20. This should be done promptly, since although the LEDs continue to blink indefinitely, after a few minutes the UAP will stop responding to TFTP. If the TFTP put attempt times out, repeat the power up reset process and try again.
– Further TFTP client instructions in here.
– If successful, the TFTP transfer will complete in a few seconds, then the LEDs will flash in various patterns. Leave the UAP alone (powered up) until the LED lights steady white, which may take several minutes.
❗ Be aware that this procedure overwrites both primary and secondary image and sets the boot select bit to 0, but does not update / upgrade the bootloader. Thus if you intend to continue use of Unifi firmware it is recommended to log into the new firmware and flash the same version again using fwupdate.real -m
Installing from OpenWrt
This is not very practical but it may be possible to extract the kernel/rootfs from an official image and use it as a sysupgrade. Realize that though /dev/mtd6 is still partitioned as “ubnt-airos” under HotspotOS, it is no longer a backup of the original firmware. When HotspotOS has been installed according to the directions above, this partition will be blank, as is necessary to prevent it from booting.
Ubiquiti UniFi AP AC Lite
Download sysupgrade HotspotOS
Non-invasive method using mtd
Connect only the Unifi to your PC. Configure the PC with a static IP such as 192.168.1.25/24. The Unifi will have IP address 192.168.1.20.
The mtd helper program, which writes directly to flash, has been removed from later versions of the stock firmware. These instructions assume that version 3.7.58 is running, which does include mtd. The stock firmware can be upgraded / downgraded using the CLI and fwupdate.real -m Copy using scp the 3.7.58 firmware to /tmp (see below), log in with ssh, and run fwupdate.real -m filename to flash it.
Stock firmware usually also includes a new bootloader. fwupdate.real -m will replace the bootloader with the version in the firmware file, but TFTP recovery (see below) does not. Check the md5 of the installed bootloader to confirm it has also been downgraded to the 3.7.58 version. Other versions may not work properly with HotspotOS.-
BZ.v3.7.58:# cat /dev/mtd0 | md5sum
88f66a79f671383eda6512d29aa1b804 –
If the bootloader partition md5 is not as above, re-flash 3.7.58 using fwupdate.real. That should only be necessary if you used TFTP recovery.
Next scp the HotspotOS sysupgrade to the RAM disk in preparation for flashing. “Factory” headers are not necessary for this process, thus no “factory” HotspotOS binaries exist.
Though originally an ar71xx target, these models have been ported to ath79 and ath79 is recommended for these models. Notice that there are different builds for the different models (Lite, Mesh, Pro, etc).
scp hotspotos-ath79-generic-ubnt_unifiac-XXX-squashfs-sysupgrade.bin ubnt@192.168.1.20:/tmp/
Original firmware uses a flip-flop flash layout where two complete copies of firmware exist in the flash, one being an older version as a backup in case the new one fails to boot. The bootloader checks the bs partition to determine whether to boot kernel0 or kernel1. If one partition holds a signed image and the other does not it will always prefer the signed one. If the selected partition is corrupted (unable to decompress kernel) or blank it will boot the other one.
HotspotOS does not use the “flip flop” process, it always must be installed in the kernel0 partition, and the kernel1 partition becomes reserved space. Thus we will erase the kernel1 partition to ensure that nothing can boot from there. As of 2018/02 sysupgrade does not yet support the flip-flop layout for these devices.
Connect to the device at ubnt@192.168.1.20 and run the following commands to install HotspotOS to kernel0 and erase kernel1:
# (replace xxxxx with your actual version and model specific filename)
BZ.v3.7.58# mtd write /tmp/openwrt-xxxxx-squashfs-sysupgrade.bin kernel0
Unlocking kernel0 …
Erasing kernel0 …
Writing from /tmp/openwrt-ath79-generic-ubnt_unifiac-lite-squashfs-sysupgrade.bin to kernel0 … [e/w]
BZ.v3.7.58# mtd erase kernel1
Unlocking kernel1 …
Erasing kernel1 …
Though not strictly necessary, it is a very good idea to write a zero to the first byte of the bs partition (check /proc/mtd for the correct path). The zero byte will direct the bootloader to try kernel0 first. A byte of 0x80 will attempt to boot kernel1, but since that partition is erased, the bootloader will revert to kernel0 anyway.
BZ.v3.9.19# cat /proc/mtd
dev: size erasesize name
mtd0: 00060000 00010000 “u-boot”
mtd1: 00010000 00010000 “u-boot-env”
mtd2: 00790000 00010000 “kernel0”
mtd3: 00790000 00010000 “kernel1”
mtd4: 00020000 00010000 “bs”
mtd5: 00040000 00010000 “cfg”
mtd6: 00010000 00010000 “EEPROM”
BZ.v3.9.19# dd if=/dev/zero bs=1 count=1 of=/dev/mtd4
1+0 records in
1+0 records out
1 byte copied, 7.3437e-05 s, 13.6 kB/s
The device is now ready to boot into HotspotOS. Issue the reboot command and wait about 2 minutes until the LED lights steady white. As is conventional, it will have a LAN network at 192.168.1.1 with a DHCP server and no WLANs activated. Manually setting your IP-address to the same subnet and connecting directly via LAN-cable will get you to LuCI or SSH.
OEM Firmware
You can download the official firmware archives for example at https://www.ubnt.com/download/unifi/unifi-ap-ac-lite, since the same firmware is used for UAP-AC-Lite/AC-LR/AC-Pro/AC-EDU devices.
Going back to the original firmware is no problem at all.
Flashing via TFTP (TFTP recovery)
HotspotOS cannot be flashed this way since the firmware must be signed. Any version of the official firmware should work though.
– Keep the reset button pressed while powering on the AP
– Wait until the LED ring is blinking white/blue/off (ca. 15 sec.) then release the button. The UAP is now a TFTP server at 192.168.1.20. It will not respond to pings or serve DHCP, so you must static IP your PC.
– TFTP PUT the image to 192.168.1.20. This should be done promptly, since although the LEDs continue to blink indefinitely, after a few minutes the UAP will stop responding to TFTP. If the TFTP put attempt times out, repeat the power up reset process and try again.
– Further TFTP client instructions in here.
– If successful, the TFTP transfer will complete in a few seconds, then the LEDs will flash in various patterns. Leave the UAP alone (powered up) until the LED lights steady white, which may take several minutes.
❗ Be aware that this procedure overwrites both primary and secondary image and sets the boot select bit to 0, but does not update / upgrade the bootloader. Thus if you intend to continue use of Unifi firmware it is recommended to log into the new firmware and flash the same version again using fwupdate.real -m
Installing from OpenWrt
This is not very practical but it may be possible to extract the kernel/rootfs from an official image and use it as a sysupgrade. Realize that though /dev/mtd6 is still partitioned as “ubnt-airos” under HotspotOS, it is no longer a backup of the original firmware. When HotspotOS has been installed according to the directions above, this partition will be blank, as is necessary to prevent it from booting.
Ubiquiti UniFi AP AC PRO
Download sysupgrade HotspotOS
Non-invasive method using mtd
– Obtain the matching HotspotOS Firmware for your device.
– Directly connect PC and Unifi-device. If your device is powered through PoE insert just this PoE injector in between and keep the setup very simple.
– Configure your PC to a static IP (192.168.1.1/255, do not use IP 192.168.1.20 or 192.168.1.1 for the computer, if unsure use IP 192.168.1.10, netmask 255.255.255.0, default gateway 192.168.1.1 for your PC)
– Power on the Unifi-device and wait until you can ping 192.168.1.20 from your PC.
– Try Win 10 OpenSSH into the Unifi-device ssh ubnt@192.168.1.20 (password is also ubnt), if it succeeds fine, otherwise try it with a hard reset as follows:
Power off the device, press the reset button and power it back on, keep the reset button pressed until its lights cycle through their colors. This takes several seconds (~20-30).
Ping will not work in this state, but the Unifi-device will activate an internal TFTP server for a few minutes and accept TFTP uploads.
Upload the Unifi Firmware 3.7.58 via TFTP. Easiest TFTP-client to use for this case is atftp:
atftp –trace –option “timeout 1” –option “mode octet” –put –local-file ubnt.bin 192.168.1.20
Wait till the Unifi-device has rebooted and responds to ping again. Now you should be able to Win 10 OpenSSH into the Unifi-device and proceed with replacing the firmware.
– Win 10 OpenSSH into the Unifi-device, the prompt states the firmware version and it must indicate version 3.7.58. If this is not the case redo the steps above. Below the green commands must be entered in the Win 10 OpenSSH session with the Unifi-device.
– Copy the Unifi-Firmware from your PC to the Unifi-device: scp ubnt.bin ubnt@192.168.1.20:/tmp/
– At your Unifi-device issue the command fwupdate.real -m /tmp/ubnt.bin to ensure the bootloader of the Unifi-device is based on version 3.7.58. Let the Unifi-device reboot.
– scp the HotspotOS Firmware to the Unifi-device scp hotspotos-ath79-generic-ubnt_unifiac-XXX-squashfs-sysupgrade.bin ubnt@192.168.1.20:/tmp/
– Win 10 OpenSSH into the Unifi-device and: mtd write /tmp/hotspotos-xxxxx-squashfs-sysupgrade.bin kernel0, afterward also erase the now unused partition mtd erase kernel1
– Find out which partition is named “bs”: cat /proc/mtd, expected result is “mtd4”. Then issue this command in the Unifi-device (use the obtained partition name for bs): dd if=/dev/zero bs=1 count=1 of=/dev/mtd4
– That’s it. On the next reboot you will see an HotspotOS firmware
Ubiquiti UniFi AC Mesh
Download sysupgrade HotspotOS
Non-invasive method using mtd
Connect only the Unifi to your PC. Configure the PC with a static IP such as 192.168.1.25/24. The Unifi will have IP address 192.168.1.20.
The mtd helper program, which writes directly to flash, has been removed from later versions of the stock firmware. These instructions assume that version 3.7.58 is running, which does include mtd. The stock firmware can be upgraded / downgraded using the CLI and fwupdate.real -m Copy using scp the 3.7.58 firmware to /tmp (see below), log in with ssh, and run fwupdate.real -m filename to flash it.
Stock firmware usually also includes a new bootloader. fwupdate.real -m will replace the bootloader with the version in the firmware file, but TFTP recovery (see below) does not. Check the md5 of the installed bootloader to confirm it has also been downgraded to the 3.7.58 version. Other versions may not work properly with HotspotOS.-
BZ.v3.7.58:# cat /dev/mtd0 | md5sum
88f66a79f671383eda6512d29aa1b804 –
If the bootloader partition md5 is not as above, re-flash 3.7.58 using fwupdate.real. That should only be necessary if you used TFTP recovery.
Next scp the HotspotOS sysupgrade to the RAM disk in preparation for flashing. “Factory” headers are not necessary for this process, thus no “factory” HotspotOS binaries exist.
Though originally an ar71xx target, these models have been ported to ath79 and ath79 is recommended for these models. Notice that there are different builds for the different models (Lite, Mesh, Pro, etc).
scp hotspotos-ath79-generic-ubnt_unifiac-XXX-squashfs-sysupgrade.bin ubnt@192.168.1.20:/tmp/
Original firmware uses a flip-flop flash layout where two complete copies of firmware exist in the flash, one being an older version as a backup in case the new one fails to boot. The bootloader checks the bs partition to determine whether to boot kernel0 or kernel1. If one partition holds a signed image and the other does not it will always prefer the signed one. If the selected partition is corrupted (unable to decompress kernel) or blank it will boot the other one.
HotspotOS does not use the “flip flop” process, it always must be installed in the kernel0 partition, and the kernel1 partition becomes reserved space. Thus we will erase the kernel1 partition to ensure that nothing can boot from there. As of 2018/02 sysupgrade does not yet support the flip-flop layout for these devices.
Connect to the device at ubnt@192.168.1.20 and run the following commands to install HotspotOS to kernel0 and erase kernel1:
# (replace xxxxx with your actual version and model specific filename)
BZ.v3.7.58# mtd write /tmp/openwrt-xxxxx-squashfs-sysupgrade.bin kernel0
Unlocking kernel0 …
Erasing kernel0 …
Writing from /tmp/openwrt-ath79-generic-ubnt_unifiac-lite-squashfs-sysupgrade.bin to kernel0 … [e/w]
BZ.v3.7.58# mtd erase kernel1
Unlocking kernel1 …
Erasing kernel1 …
Though not strictly necessary, it is a very good idea to write a zero to the first byte of the bs partition (check /proc/mtd for the correct path). The zero byte will direct the bootloader to try kernel0 first. A byte of 0x80 will attempt to boot kernel1, but since that partition is erased, the bootloader will revert to kernel0 anyway.
BZ.v3.9.19# cat /proc/mtd
dev: size erasesize name
mtd0: 00060000 00010000 “u-boot”
mtd1: 00010000 00010000 “u-boot-env”
mtd2: 00790000 00010000 “kernel0”
mtd3: 00790000 00010000 “kernel1”
mtd4: 00020000 00010000 “bs”
mtd5: 00040000 00010000 “cfg”
mtd6: 00010000 00010000 “EEPROM”
BZ.v3.9.19# dd if=/dev/zero bs=1 count=1 of=/dev/mtd4
1+0 records in
1+0 records out
1 byte copied, 7.3437e-05 s, 13.6 kB/s
The device is now ready to boot into HotspotOS. Issue the reboot command and wait about 2 minutes until the LED lights steady white. As is conventional, it will have a LAN network at 192.168.1.1 with a DHCP server and no WLANs activated. Manually setting your IP-address to the same subnet and connecting directly via LAN-cable will get you to LuCI or SSH.
OEM Firmware
You can download the official firmware archives for example at https://www.ubnt.com/download/unifi/unifi-ap-ac-lite, since the same firmware is used for UAP-AC-Lite/AC-LR/AC-Pro/AC-EDU devices.
Going back to the original firmware is no problem at all.
Flashing via TFTP (TFTP recovery)
HotspotOS cannot be flashed this way since the firmware must be signed. Any version of the official firmware should work though.
– Keep the reset button pressed while powering on the AP
– Wait until the LED ring is blinking white/blue/off (ca. 15 sec.) then release the button. The UAP is now a TFTP server at 192.168.1.20. It will not respond to pings or serve DHCP, so you must static IP your PC.
– TFTP PUT the image to 192.168.1.20. This should be done promptly, since although the LEDs continue to blink indefinitely, after a few minutes the UAP will stop responding to TFTP. If the TFTP put attempt times out, repeat the power up reset process and try again.
– Further TFTP client instructions in here.
– If successful, the TFTP transfer will complete in a few seconds, then the LEDs will flash in various patterns. Leave the UAP alone (powered up) until the LED lights steady white, which may take several minutes.
❗ Be aware that this procedure overwrites both primary and secondary image and sets the boot select bit to 0, but does not update / upgrade the bootloader. Thus if you intend to continue use of Unifi firmware it is recommended to log into the new firmware and flash the same version again using fwupdate.real -m
Installing from OpenWrt
This is not very practical but it may be possible to extract the kernel/rootfs from an official image and use it as a sysupgrade. Realize that though /dev/mtd6 is still partitioned as “ubnt-airos” under HotspotOS, it is no longer a backup of the original firmware. When HotspotOS has been installed according to the directions above, this partition will be blank, as is necessary to prevent it from booting.
Ubiquiti UniFi AC Mesh Pro
Download sysupgrade HotspotOS
Non-invasive method using mtd
Connect only the Unifi to your PC. Configure the PC with a static IP such as 192.168.1.25/24. The Unifi will have IP address 192.168.1.20.
The mtd helper program, which writes directly to flash, has been removed from later versions of the stock firmware. These instructions assume that version 3.7.58 is running, which does include mtd. The stock firmware can be upgraded / downgraded using the CLI and fwupdate.real -m Copy using scp the 3.7.58 firmware to /tmp (see below), log in with ssh, and run fwupdate.real -m filename to flash it.
Stock firmware usually also includes a new bootloader. fwupdate.real -m will replace the bootloader with the version in the firmware file, but TFTP recovery (see below) does not. Check the md5 of the installed bootloader to confirm it has also been downgraded to the 3.7.58 version. Other versions may not work properly with HotspotOS.-
BZ.v3.7.58:# cat /dev/mtd0 | md5sum
88f66a79f671383eda6512d29aa1b804 –
If the bootloader partition md5 is not as above, re-flash 3.7.58 using fwupdate.real. That should only be necessary if you used TFTP recovery.
Next scp the HotspotOS sysupgrade to the RAM disk in preparation for flashing. “Factory” headers are not necessary for this process, thus no “factory” HotspotOS binaries exist.
Though originally an ar71xx target, these models have been ported to ath79 and ath79 is recommended for these models. Notice that there are different builds for the different models (Lite, Mesh, Pro, etc).
scp hotspotos-ath79-generic-ubnt_unifiac-XXX-squashfs-sysupgrade.bin ubnt@192.168.1.20:/tmp/
Original firmware uses a flip-flop flash layout where two complete copies of firmware exist in the flash, one being an older version as a backup in case the new one fails to boot. The bootloader checks the bs partition to determine whether to boot kernel0 or kernel1. If one partition holds a signed image and the other does not it will always prefer the signed one. If the selected partition is corrupted (unable to decompress kernel) or blank it will boot the other one.
HotspotOS does not use the “flip flop” process, it always must be installed in the kernel0 partition, and the kernel1 partition becomes reserved space. Thus we will erase the kernel1 partition to ensure that nothing can boot from there. As of 2018/02 sysupgrade does not yet support the flip-flop layout for these devices.
Connect to the device at ubnt@192.168.1.20 and run the following commands to install HotspotOS to kernel0 and erase kernel1:
# (replace xxxxx with your actual version and model specific filename)
BZ.v3.7.58# mtd write /tmp/openwrt-xxxxx-squashfs-sysupgrade.bin kernel0
Unlocking kernel0 …
Erasing kernel0 …
Writing from /tmp/openwrt-ath79-generic-ubnt_unifiac-lite-squashfs-sysupgrade.bin to kernel0 … [e/w]
BZ.v3.7.58# mtd erase kernel1
Unlocking kernel1 …
Erasing kernel1 …
Though not strictly necessary, it is a very good idea to write a zero to the first byte of the bs partition (check /proc/mtd for the correct path). The zero byte will direct the bootloader to try kernel0 first. A byte of 0x80 will attempt to boot kernel1, but since that partition is erased, the bootloader will revert to kernel0 anyway.
BZ.v3.9.19# cat /proc/mtd
dev: size erasesize name
mtd0: 00060000 00010000 “u-boot”
mtd1: 00010000 00010000 “u-boot-env”
mtd2: 00790000 00010000 “kernel0”
mtd3: 00790000 00010000 “kernel1”
mtd4: 00020000 00010000 “bs”
mtd5: 00040000 00010000 “cfg”
mtd6: 00010000 00010000 “EEPROM”
BZ.v3.9.19# dd if=/dev/zero bs=1 count=1 of=/dev/mtd4
1+0 records in
1+0 records out
1 byte copied, 7.3437e-05 s, 13.6 kB/s
The device is now ready to boot into HotspotOS. Issue the reboot command and wait about 2 minutes until the LED lights steady white. As is conventional, it will have a LAN network at 192.168.1.1 with a DHCP server and no WLANs activated. Manually setting your IP-address to the same subnet and connecting directly via LAN-cable will get you to LuCI or SSH.
OEM Firmware
You can download the official firmware archives for example at https://www.ubnt.com/download/unifi/unifi-ap-ac-lite, since the same firmware is used for UAP-AC-Lite/AC-LR/AC-Pro/AC-EDU devices.
Going back to the original firmware is no problem at all.
Flashing via TFTP (TFTP recovery)
HotspotOS cannot be flashed this way since the firmware must be signed. Any version of the official firmware should work though.
– Keep the reset button pressed while powering on the AP
– Wait until the LED ring is blinking white/blue/off (ca. 15 sec.) then release the button. The UAP is now a TFTP server at 192.168.1.20. It will not respond to pings or serve DHCP, so you must static IP your PC.
– TFTP PUT the image to 192.168.1.20. This should be done promptly, since although the LEDs continue to blink indefinitely, after a few minutes the UAP will stop responding to TFTP. If the TFTP put attempt times out, repeat the power up reset process and try again.
– Further TFTP client instructions in here.
– If successful, the TFTP transfer will complete in a few seconds, then the LEDs will flash in various patterns. Leave the UAP alone (powered up) until the LED lights steady white, which may take several minutes.
❗ Be aware that this procedure overwrites both primary and secondary image and sets the boot select bit to 0, but does not update / upgrade the bootloader. Thus if you intend to continue use of Unifi firmware it is recommended to log into the new firmware and flash the same version again using fwupdate.real -m
Installing from OpenWrt
This is not very practical but it may be possible to extract the kernel/rootfs from an official image and use it as a sysupgrade. Realize that though /dev/mtd6 is still partitioned as “ubnt-airos” under HotspotOS, it is no longer a backup of the original firmware. When HotspotOS has been installed according to the directions above, this partition will be blank, as is necessary to prevent it from booting.
Ubiquiti LiteStation-SR71 LS-SR71
Download HotspotOS
Installation via vendor firmware:
– upload factory image via webinterface
Ubiquiti Litebeam M5
Download HotspotOS
Installation via vendor firmware:
– upload factory image via webinterface
Doesn’t work:
* Flash via TFTP with Ubiquiti Uboot
Ubiquiti PowerBeam M5-400
Download HotspotOS
Warning! Do NOT flash if AirOS version is 5.6 or higher!! Downgrade first with AirOS 5.5.x
Downgrade to XW AirOS 5.6.15 in the Web interface.
Then to XW AirOS 5.5.10 using TFTP recover mode and then flash HotspotOS using TFTP
Downgrading to 5.5.10 via TFTP might not work (firmware not accepted). Logging in via ssh and using fwupdate.real.
TFTP recovery
Hold down reset button while plugging in at least 30 seconds until LED 1 & 3 is altenating to LED 2 & 4. See also: TFTP recovery and LED codes Setup your computer to 192.168.1.5/24, start TFTP transfer:
tftp 192.168.1.20
tftp> bin
tftp> trace
tftp> put XW.v5.5.10-u2.28005.150723.1358.bin
tftp> quit
Ubiquiti RouterStation Pro
Download factory HotspotOS
NOTE: The firmware image for the routerstation and the one for the routerstation.pro are NOT INTERCHANGEABLE. If you install the wrong one, your system will NOT boot.
Boot the device into recovery mode by:
– connecting an ethernet cable to the WAN port
– holding the reset button for a few seconds while powering on the device
In recovery mode the router has an IP address of 192.168.1.20. Set your PC to have a static IP address in the 192.168.1.0/24 range, for example 192.168.1.10 with a netmask of 255.255.255.0.
A ping will check that the router is active (optional):
ping 192.168.1.20
In recovery mode, the Routerstation Pro is a TFTP server waiting for a file to be sent from a TFTP (not FTP) client on your PC. Use the actual name of the firmware file you downloaded.
tftp 192.168.1.20 -m binary -c put hotspotos-ath79-generic-ubnt_routerstation-pro-squashfs-factory.bin